Contact: pmcdap.org@gmail.com
So, you want to contribute to our database? You've got some CD albums, or related demos or CD-ROM programs that are missing from our database? First, we recommend you read the FAQ page, particularly the section "What albums are accepted into the database?" If it meets the criteria listed there, then you're ready to go!
We highly recommend that you only use one of the following programs on the list.
1. IMGBurn (Windows)
IMGBurn is a reliable CD dumper and burner for Windows, and it has been used for dumping the discs of all our own submissions. If you're using Windows, we recommend you download IMGBurn from this link (version 2.5.0.0).
WARNING: The latest versions of IMGBurn (NOT from the link) are known to bundle malware in their installer! It is important that you download the correct version as specified. We are not responsible for any damage caused to your computer.
Note that the program is only available for Windows, although it can be used on other OS's via software like Wine, or by dual-booting your Mac computer into Windows with Boot Camp.
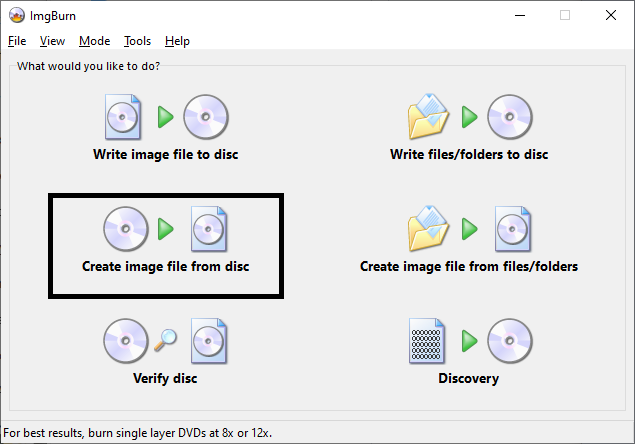
Usage of IMGBurn is very straightforward. Once you have finished installing the program, you are prompted with a series of options. For our purposes, select "Create image file from disc" as seen in the screenshot.
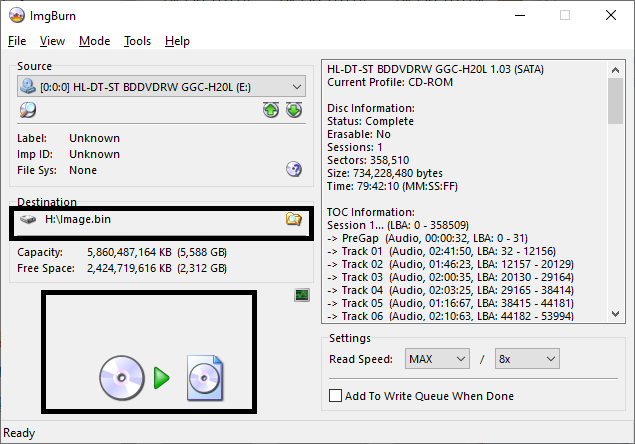
Once the disc is listed as being ready, you'll need to select where you want the resulting files. Set the "Destination" folder and file (Name it anything you want, but we recommend to keep the filename related to the album title or code), and then hit the large icon in the bottom left corner as seen in the screenshot.
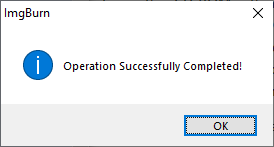
If all goes well, you should be greeted by the message "Operation Successfully Completed!" with a happy jingle of music. Press "OK" and then remove the disc from your drive.
The resulting file(s) should be a pair of files in BIN and CUE format, or if you are dealing with either a CD-ROM with no audio tracks or a DVD-ROM, it will come in an ISO file. Additionally, you might also get a CDT file. Keep this, as it is used for internal CD text on some CDs, especially later releases.
NOTE: Audio CDs or CD-ROMs with audio tracks CANNOT be dumped as ISO!
2. fre:ac: Free Audio Converter (Windows/Mac/Linux)
fre:ac is an easy-to-use audio converter available for Windows, Mac, and Linux which includes a CD ripper that works accurately enough. Note that for obvious reasons, it only is useful for pure audio CDs; data CDs (CD-ROMs) or mixed-mode CDs (CDs with both audio and data tracks) as well as DVDs must use traditional disc dumping software.
Like IMGBurn, usage is straightforward. However, before you start the program, you should set a few settings as follows:
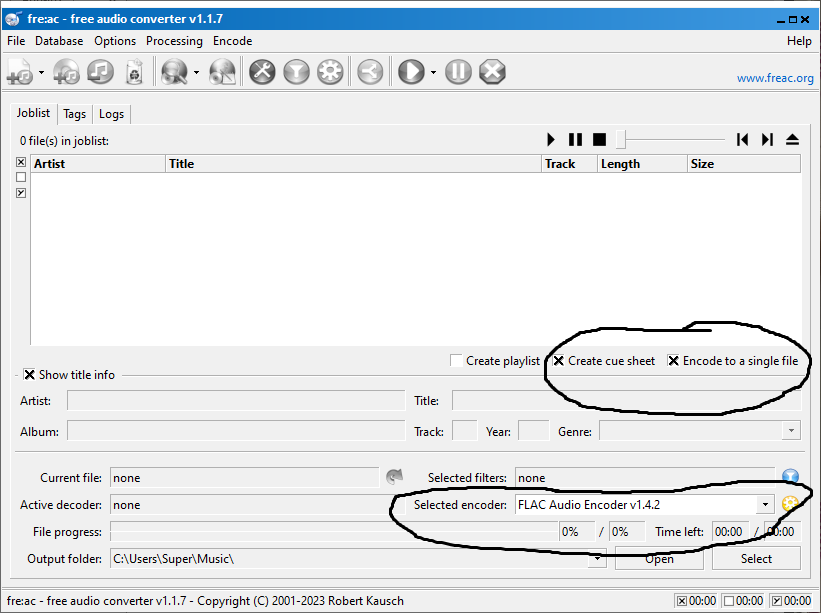
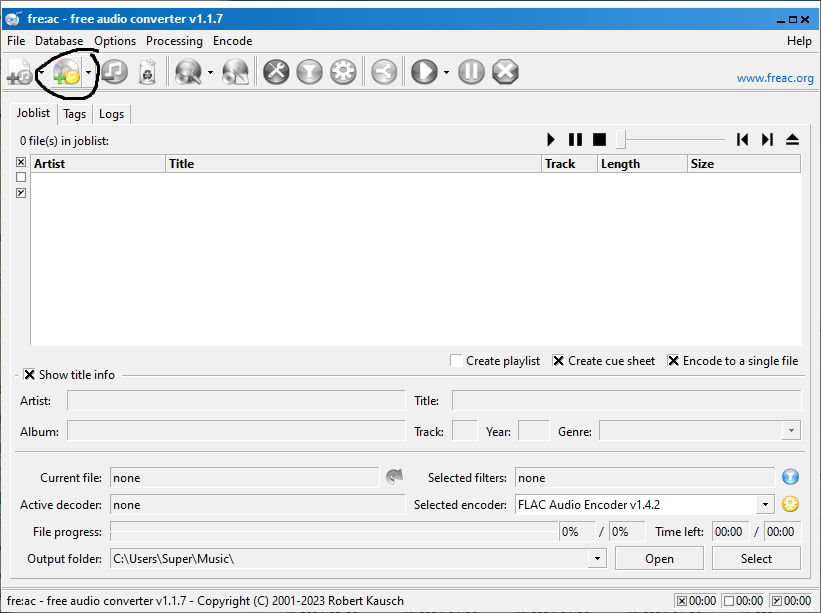
Make sure that "Create Cue Sheet" and "Encode to a single file" are both checked. Also make sure that "Selected Encoder" is set to "FLAC Audio Encoder". Why FLAC over other formats like MP3? This is explained in the FAQ. ("Windows Wave File Output" is also acceptable, but it will result in a larger file size than FLAC.)
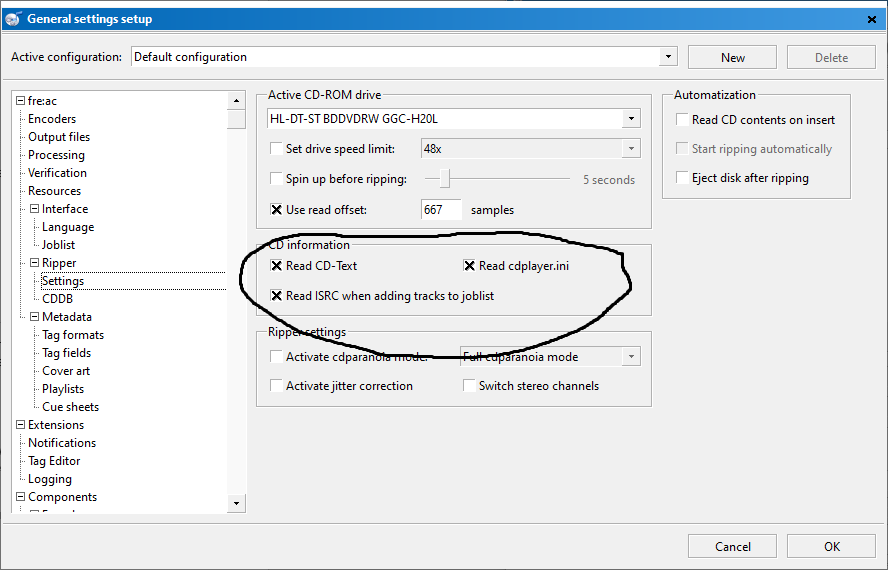
Then go into "General Settings" and then "Ripper/Settings", and make sure that "Read CD-Text" and "Read ISRC when adding tracks to joblist" are both checked. (The second is not checked by default.)
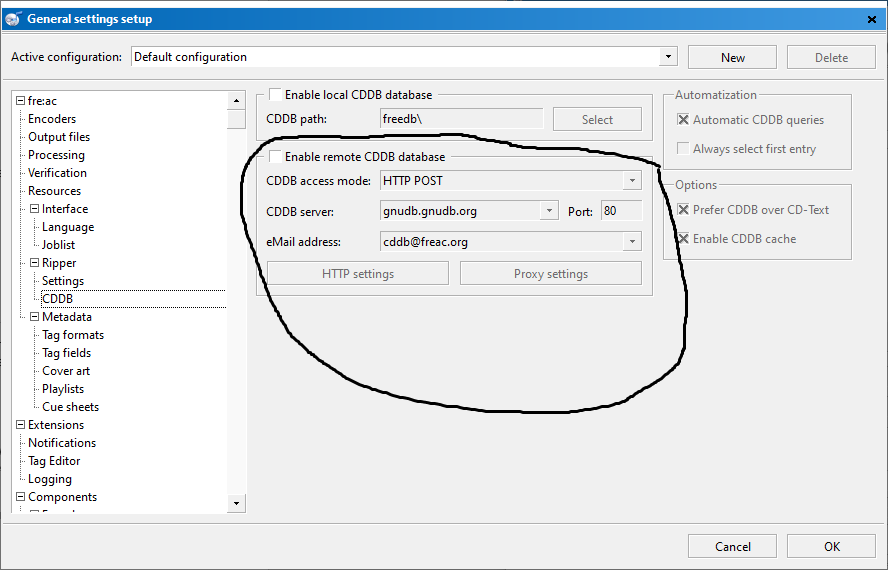
Finally, go to "Ripper/CDDB" and uncheck "Enable remote CDDB database". This will prevent external data from overwriting embedded CD text.
To start ripping a disc, once you have inserted it, click on the arrow to the right of the CD icon on the toolbar at the top of the program, and select the CD drive being used.
Afterwards, you might see a window like the following:
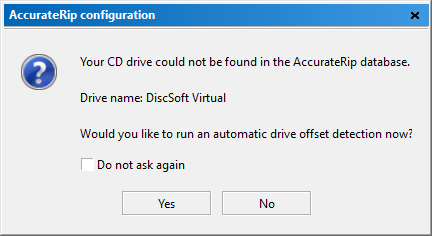
Select "Yes" to the prompt and it will automatically detect your drive offset.
To start the ripping process, press the "Play"/right arrow button at the top of the program, and you'll be prompted where you want to save the folder and what you want it to be named. (Try to keep the filename at least related to the album or CD ID.)
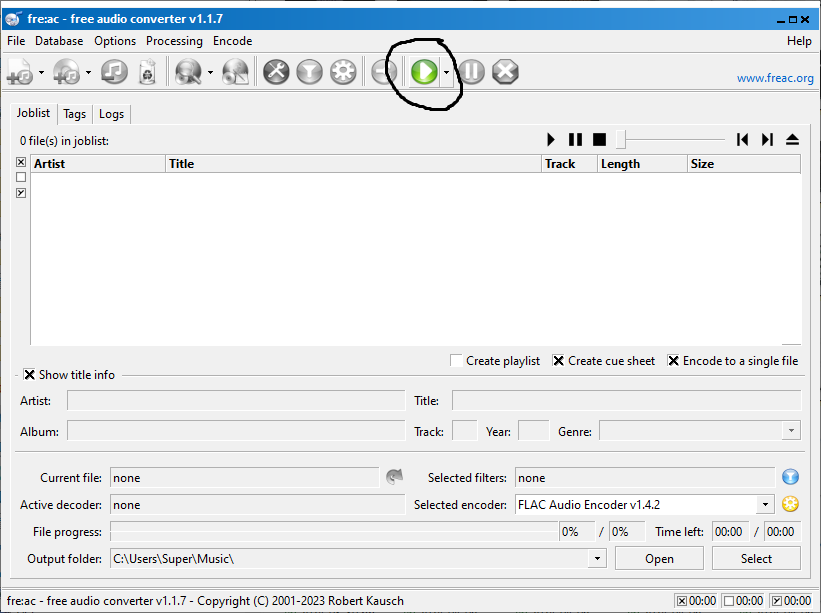
Wait for the program to finish ripping, and you're done! Your resulting file will be in a pair of a FLAC (or WAV) and CUE files. (The CUE file format is used to determine the offsets of each track in the FLAC file, similar to with BIN files.)
One final note: DO NOT edit the final CUE file. This may contain information such as ISRC tags or CD text present on the actual disc (necessary for re-creating the original disc) that may be lost if you alter it! (Note that only later discs have these)
3. Exact Audio Copy (EAC) (Windows)
Another popular tool is Exact Audio Copy (EAC) for Windows, which is similar to fre:ac. As its name implies, it is an accurate CD ripper tool.
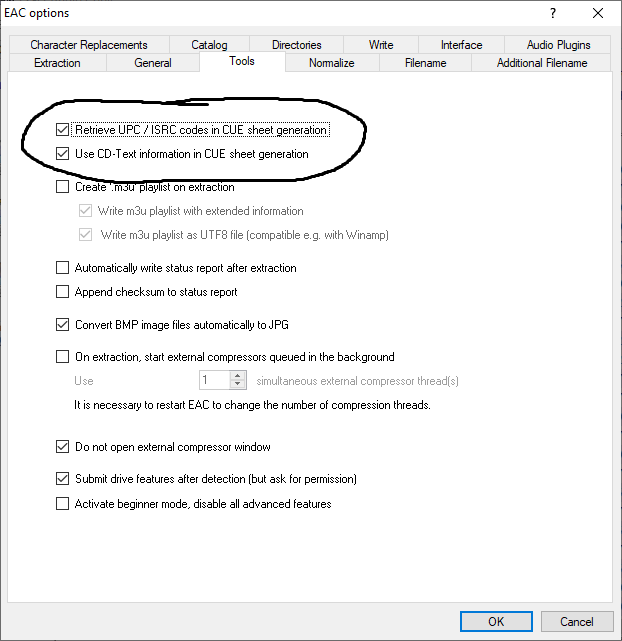
Before you rip a disc, there's two settings that you should edit. From the toolbar, go to "EAC" and then "EAC options", and then go to the "Tools Tab". There, you should make sure that the top two options, "Retrieve UPC/ISRC codes in CUE sheet generation", and "Use CD-Text information in CUE sheet generation", are both checked. The first of these is not checked by default.
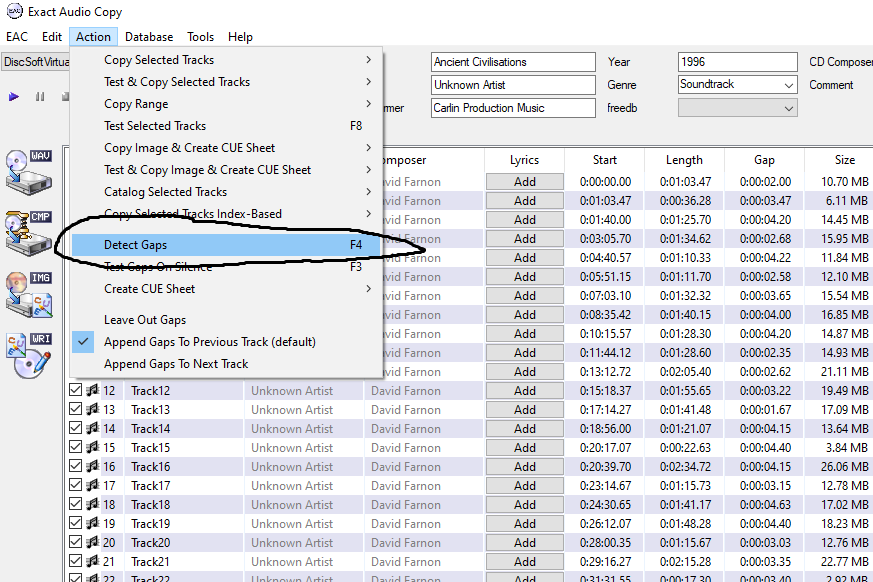
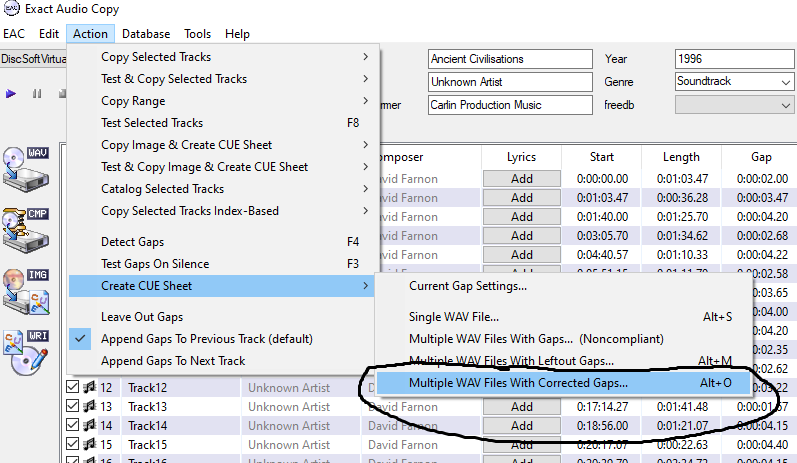
Once you're ready to rip a CD, first go to "Action" on the toolbar and then "Detect Gaps". Alternatively, you can press F4.
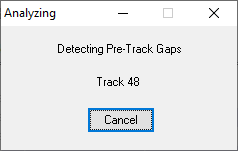
Wait for the program to detect the gap data on the CD. This will take a while.
When that is complete, go to "Action" again on the toolbar, then "Create CUE sheet" and "Multiple WAV Files With Corrected Gaps. (Do NOT select "Multiple WAV Files With Leftout Gaps"). Alternatively, press Alt+O. Then select a folder where you want the WAV files and the CUE file to be saved.
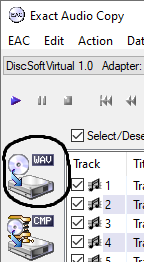
To start the actual ripping process, click on the "WAV" icon as shown in the screenshot on the left-hand side of the program, and choose the same folder you saved the CUE file.
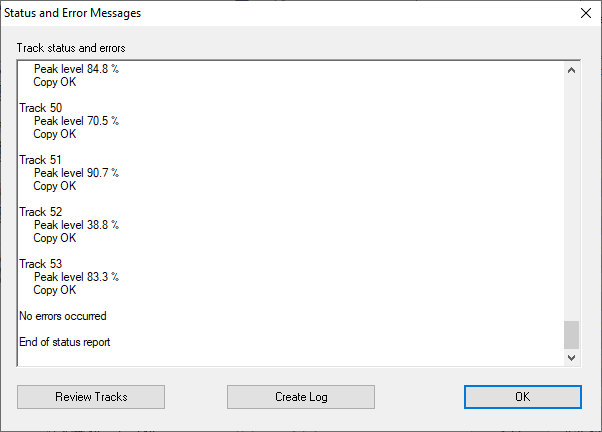
When that's done, you can optionally click the "Create Log" button to save a generated LOG file. Otherwise, click "OK", and you're done.
4. DiscImageCreator (Windows/Mac/Linux)
As an alternative, you can also use Redump's own DiscImageCreator which is available for Windows, Mac, and Linux. It is extremely accurate, but be aware that it only works with certain types of disc drives (unless you're ripping DVD images).
See the project page's wiki for details on how to use the program.
5. CDRDAO (Windows/Mac/Linux)
If you're using Mac or Linux, you can use cdrdao, a command-line program. Note that this only work with CDs - see option 4 (or alternatively 2) for DVDs. In order to dump a disc, simply use the following command:
cdrdao read-cd "
After the program finishes, you will see a message which states "Found (number) Q sub-channels with CRC errors." This is normal. You'll end up with a pair of BIN and TOC files, with the BIN file named "data.bin". However, these need to be converted to a more standard BIN and CUE pair.
You'll need to use the companion program TOC2CUE to convert the TOC file to a CUE. It can be used as follows:
toc2cue "
However, as the program warns, the byte order of the dumped BIN file is inverted (big-endian), so it needs to be converted (to little-endian). We can use a simple tool called byte-swapper to do this.
Open the downloaded ZIP file and navigate to the "windows_build" or "linux_build" folder, depending on which OS you used (Mac currently isn't included). Then copy/extract the application file to the folder where CDRDAO is located. Then use the following command:
byte_swap "data.bin"
When that finishes, you'll end up with a file named "data.bin.rev". Delete the original data.bin file and rename the resulting bin.rev file to "
6. DD (diskdump) (Mac/Linux)
For DVDs, Linux, as well as Mac, has a built-in terminal command called DD, standing for diskdump, which can make ISO images of DVDs. It can be used with the following command:
dd if=/dev/cdrom of=image_name.iso
When that finishes, you'll end up with an ISO file. Rename it if needed.
If you encounter issues during dumping like reported "read errors" or "retries" or the read speed slows down significantly to about 0 and your CD drive makes weird noises, you've got a bad dump, and your disc is either dirty or scratched, and it needs to be cleaned. If it's merely dirty, sometimes the fix is just to wipe off smudges. Otherwise, it will require more serious cleaning. If you are unable to clean it, look into getting a replacement, if available.
If you cannot get a good dump whatsoever, look into sending several "failed" dumps to see if we can do some hacky Frankenstein work to create a reconstructed "good" image. It's messy but it's the best we can do for now.
If you end up with multiple BIN files for every individual CD track (i.e. Redump-style), you'll need to "merge" these all into one BIN file. CDMage is a Windows tool that is capable of doing this.
After dumping a disc, it's time to create image scans of all the associated media. Ideally, these should be scanned with a photo scanner.
If you don't have a scanner or are unable to acquire one, you can use a camera or phone camera to take pictures of each part of the media. Just make sure that all the text is legible in the photos, and that there is no glare. Additionally, for the front cover, this should be taken out of the jewel case (if this is a jewel case album). The same goes for the insert card on the back (see below).
ALL parts of the associated media need to be scanned - all pages of the booklet, the back and sides, and the disc itself.
For jewel cases, the back insert, containing the back cover of the CD and the spines, needs to be removed from the plastic covering holding the CD. Here is a video showing how to "pop" this off, and be careful you don't damage the CD holder (also make sure that the CD is taken out of there)! Also, if there is a unique design on the other side of the insert (i.e. not just plain white), it must be scanned as well. Additionally, only the front of the disc itself needs to be scanned.
If you're dealing with a digipak release (i.e. those, particularly later ones, with a cardboard folding case), it's more difficult to scan, but it is doable.
If, for whatever reason, the booklet or any other associated media is missing, please let us know, and hopefully the missing scans will be found soon.
Now it's time to wrap things up. You'll need to create a submission file to complete the process. Download the template file from the downloads section, and fill in each of the required fields as follows:
Save the filled out text file as "Submission.txt". Now, with that settled, you'll need to send an email to our address. You'll need to upload the disc image files themselves, the submission text file, and all the image scans compressed in a ZIP, 7Z, or RAR file. It can be either an attachment or downloadable from any of the following websites:
Once submitted, it will be checked to verify that all the required files are present. If the file cannot be downloaded or has issues such as missing required files, we will let you know and you will be prompted to attempt your submission again.
A submission will be rejected if:
If all steps were followed correctly, you will receive a confirmation email and your contribution will be submitted to the database! Congratulations, and thank you for your contribution!
This website does not host images of the CDs in the database. PMCDAP is a non-profit preservation project. It is not affiliated with any of the labels behind the media in the database.